拯救 – 孙楠–:– / 05:32
(*+﹏+*)
MyBatis是一个基于Java的持久层框架,它支持定制化 SQL、存储过程以及高级映射。现将spring boot整合Mybatis。
添加依赖
添加mybatis的依赖
- <!– https://mvnrepository.com/artifact/org.mybatis.spring.boot/mybatis-spring-boot-starter –>
- <dependency>
- <groupId>org.mybatis.spring.boot</groupId>
- <artifactId>mybatis-spring-boot-starter</artifactId>
- <version>1.3.0</version>
- </dependency>
项目会自动加载application.properties,在里面定义mybatis配置路径和数据源
- #加载mybatis配置文件
- mybatis.mapper-locations =classpath:mapper/*Mapper.xml
- mybatis.config-location =classpath:mapper/config/sqlConfig.xml
- #定义别名
- mybatis.type-aliases-package =com.wenqy.domain
- #数据源
- spring.datasource.url =jdbc:mysql://localhost:3306/wordpress
- spring.datasource.driver-class-name =com.mysql.jdbc.Driver
- spring.datasource.username =root
- spring.datasource.password =123456
- spring.datasource.max-active=10
- spring.datasource.max-idle=5
- spring.datasource.min-idle=0
添加mysql的jdbc依赖
- <!– https://mvnrepository.com/artifact/mysql/mysql-connector-java –>
- <dependency>
- <groupId>mysql</groupId>
- <artifactId>mysql-connector-java</artifactId>
- <version>5.1.42</version>
- </dependency>
接下来就是mybatis的规范编程
定义domain bean
- public class User implements Serializable{
- private int id;
- private String name;
- public int getId() {
- return id;
- }
- public void setId(int id) {
- this.id = id;
- }
- public String getName() {
- return name;
- }
- public void setName(String name) {
- this.name = name;
- }
- }
定义mybatis Mapper 接口
- @Mapper
- public interface UserMapper {
- /**
- *
- * @Title: findAll
- * @Description:
- * @param
- * @return List<User>
- * @throws
- */
- public List<User> findAll();
- /**
- *
- * @Title: getUserById
- * @Description:
- * @param @param id
- * @param
- * @return User
- * @throws
- */
- public User getUserById(int id);
- }
使用Mapper注解进行注入
定义UserMapper.xml映射文件
- <!– namespace必须指向Dao接口 –>
- <mapper namespace=“com.wenqy.mapper.UserMapper”>
- <!– 所有列 –>
- <sql id=“Column_list”>
- id,
- name
- </sql>
- <resultMap id=“ListUser” type=“com.wenqy.domain.User” >
- <id column=“id” property=“id” />
- <result column=“name” property=“name” />
- </resultMap>
- <!– 根据ID查询数据 –>
- <select id=“getUserById” parameterType=“int” resultMap=“ListUser”>
- SELECT
- <include refid=“Column_list” />
- FROM user
- WHERE id = #{id}
- </select>
- <!– 查询所有用户 –>
- <select id=“findAll” resultType=“com.wenqy.domain.User”>
- SELECT * FROM user
- </select>
- </mapper>
定义service接口
- public interface UserService {
- /**
- *
- * @Title: findAll
- * @Description:
- * @param
- * @return List<User>
- * @throws
- */
- public List<User> findAll();
- /**
- *
- * @Title: getUserById
- * @Description:
- * @param @param id
- * @param
- * @return User
- * @throws
- */
- public User getUserById(int id);
- }
定义service实现类
- @Service
- public class UserServiceImpl implements UserService {
- @Autowired
- private UserMapper userMapper;
- public List<User> findAll() {
- List<User> userList = userMapper.findAll();
- return userList;
- }
- public User getUserById(int id) {
- User userById = userMapper.getUserById(id);
- return userById;
- }
- }
定义表现层
- @RestController
- @RequestMapping(“/user”)
- public class UserController {
- @Autowired
- private UserService userService;
- @RequestMapping(“/{id}”)
- public User getUserById(@PathVariable(“id”) int id) {
- User userById = userService.getUserById(id);
- return userById;
- }
- @RequestMapping(“/findAll”)
- public List<User> findAll() {
- List<User> findAll = userService.findAll();
- return findAll;
- }
- // public static void main(String[] args) {
- // SpringApplication.run(UserController.class, args);
- // }
- }
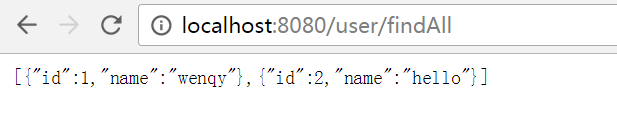
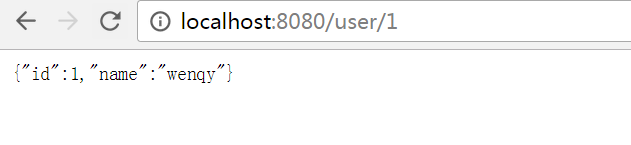
访问路由,效果图
为mybatis添加分页插件
添加分页依赖
- <!–pagehelper–>
- <dependency>
- <groupId>com.github.pagehelper</groupId>
- <artifactId>pagehelper-spring-boot-starter</artifactId>
- <version>1.1.2</version>
- </dependency>
在application.properties 添加分页配置
- #pagehelper
- pagehelper.helperDialect=mysql
- pagehelper.reasonable=true
- pagehelper.supportMethodsArguments=true
- pagehelper.params=count=countSql
控制层,在控制层加入PageHelper分页工具类方法。
- /**
- *
- * @Title: findByPage
- * @Description: 分页查询
- * @param @param pageNo
- * @param 页数
- * @return List<User> 页数据
- * @throws
- */
- @RequestMapping(“/find/{pageNo}”)
- public List<User> findByPage(@PathVariable(“pageNo”) int pageNo) {
- PageHelper.startPage(pageNo, 5);
- List<User> findAll = userService.findAll();
- System.out.println(“Total: “ + ((Page<User>) findAll).getTotal());
- return findAll;
- }
查询结果

Springboot快速开发,的确是如此的优雅,如此的简洁。我启动项目的时候却报错了,说无法连接数据库,发现是application.properties配置有前缀空格,而项目不是用utf8编码的,弄了我好久,这让我无比郁闷。。。
参考:
http://www.mybatis.org/spring-boot-starter/mybatis-spring-boot-autoconfigure/index.html


发表评论