现在学习springboot项目与Redis K-V存储系统的整合。在虚拟机上模拟了Redis集群,如果觉得启动不方便,可以用SecureCRT,XShell等终端仿真程序工具去连虚拟机。如果虚拟机没有安装SSH,使用NAT模式连接虚拟机网络。
安装SSH
sudo apt-get install openssh-server
安装完后自动启动。然后就可以用终端仿真程序工具连了,如果是Ubuntu无法更新,可以参考:http://wenqy.com/2016/03/16/ubuntu%e6%95%b0%e6%8d%ae%e6%ba%90%e5%88%97%e8%a1%a8.html Ubuntu如何修改数据源列表。
开发
添加依赖,加载Jedis
- <!– https://mvnrepository.com/artifact/org.springframework.boot/spring-boot-starter-redis –>
- <dependency>
- <groupId>org.springframework.boot</groupId>
- <artifactId>spring-boot-starter-redis</artifactId>
- <version>1.4.7.RELEASE</version>
- </dependency>
添加redis配置
springboot配置文件中添加集群的信息
- #整合redis,使用redis实现缓存
- # Redis数据库索引(默认为0)
- #spring.redis.database=0
- # Redis服务器地址,单机
- #spring.redis.host=192.168.56.101
- # Redis服务器连接端口,单机
- #spring.redis.port=6379
- spring.redis.cluster.nodes=192.168.56.101:30001,192.168.56.101:30002,192.168.56.101:30003,192.168.56.101:30004,192.168.56.101:30005,192.168.56.101:30006
- # Redis服务器连接密码(默认为空)
- spring.redis.password=
- # 连接池最大连接数(使用负值表示没有限制)
- spring.redis.pool.max-active=8
- # 连接池最大阻塞等待时间(使用负值表示没有限制)
- spring.redis.pool.max-wait=-1
- # 连接池中的最大空闲连接
- spring.redis.pool.max-idle=8
- # 连接池中的最小空闲连接
- spring.redis.pool.min-idle=0
- # 连接超时时间(毫秒)
- spring.redis.timeout=0
- spring.redis.commandTimeout=5000
项目入口类加入注解@EnableCaching,添加到缓存
- @SpringBootApplication
- @MapperScan(basePackages = “com.wenqy.mapper”)
- @EnableCaching
- public class HelloWorldApp {
- public static void main(String[] args) {
- SpringApplication.run(HelloWorldApp.class, args);
- }
- }
- /**
- *
- * @Title: findAll
- * @Description: 加入redis,测试缓存
- * @param @return 设定文件
- * @return List<User> 返回类型
- * @throws
- */
- @RequestMapping(“/findAll”)
- @Cacheable(value=“redis”)
- public List<User> findAll() {
- System.out.println(“进入findAll…”);
- List<User> findAll = userService.findAll();
- return findAll;
- }
自定义redis配置,加入集群
- @Configuration
- @ConditionalOnClass({JedisCluster.class})
- public class RedisConfig {
- @Value(“${spring.redis.cluster.nodes}”)
- private String clusterNodes;
- @Value(“${spring.redis.timeout}”)
- private int timeout;
- @Value(“${spring.redis.pool.max-idle}”)
- private int maxIdle;
- @Value(“${spring.redis.pool.max-wait}”)
- private long maxWaitMillis;
- @Value(“${spring.redis.commandTimeout}”)
- private int commandTimeout;
- @Bean
- public JedisCluster getJedisCluster() {
- String[] cNodes = clusterNodes.split(“,”);
- Set<HostAndPort> nodes = new HashSet<HostAndPort>();
- // 分割出集群节点
- for (String node : cNodes) {
- String[] hp = node.split(“:”);
- nodes.add(new HostAndPort(hp[0],Integer.parseInt(hp[1])));
- }
- JedisPoolConfig jedisPoolConfig = new JedisPoolConfig();
- jedisPoolConfig.setMaxIdle(maxIdle);
- jedisPoolConfig.setMaxWaitMillis(maxWaitMillis);
- // 创建集群对象
- // JedisCluster jedisCluster = new JedisCluster(nodes,commandTimeout);
- JedisCluster jedisCluster = new JedisCluster(nodes,commandTimeout,jedisPoolConfig);
- return jedisCluster;
- }
- }
Service实现类中,自动注入jedisCluster
- @Autowired
- private JedisCluster jedisCluster;
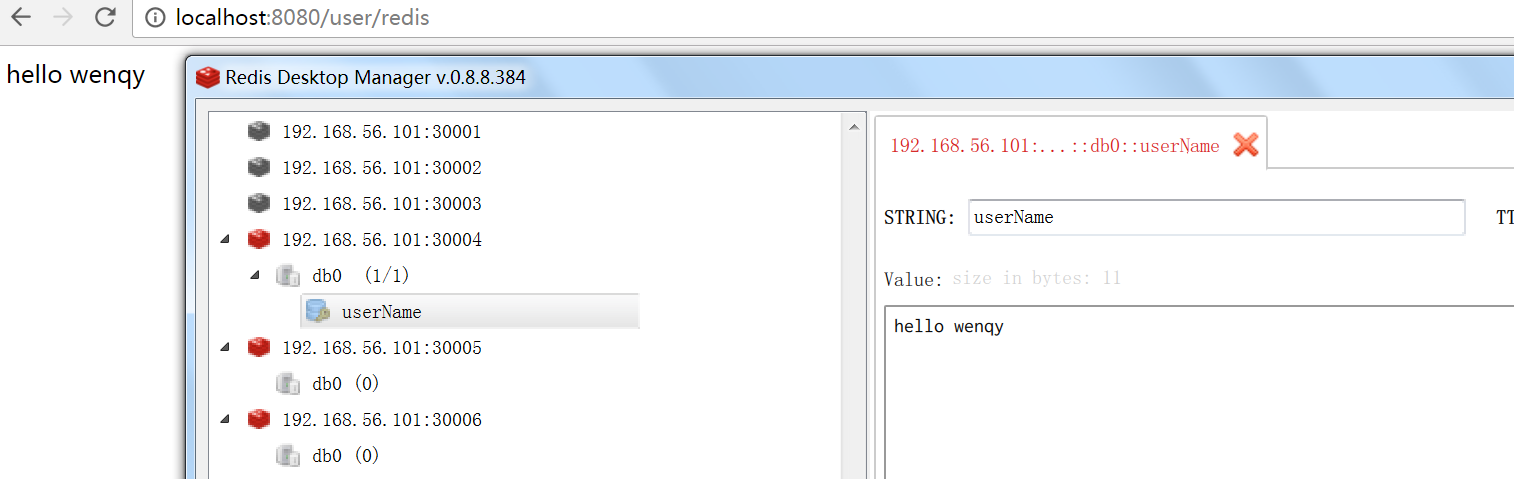
并写入一个测试方法
- public String findRedis() {
- jedisCluster.set(“userName”, “hello wenqy”);
- return jedisCluster.get(“userName”);
- }
在控制层加入调用刚才的service方法
- @RequestMapping(“/redis”)
- public String findRedis() {
- return userService.findRedis();
- }
测试
在findRedis方法中打断点,第一次访问时建立缓存,第二次访问发现没有进入该函数。但返回的结果是一样的。
最后访问
安装Redis集群
在前面写过Redis单机版集群http://wenqy.com/2017/02/08/redis%e5%8d%95%e6%9c%ba%e7%89%88%e9%9b%86%e7%be%a4.html,是主从模式的方案。现用redis-trib命令,一个Ruby程序来构建单机集群。
发现gem install redis没办法使用,原来ruby 的gem被和谐了,只能将Ruby的镜像转到国内淘宝镜像。
gem sources --remove https://rubygems.org/$ gem sources -a https://ruby.taobao.org/$ gem sources -l
然后更新源列表,安装Rails
gem update --system
Sudo gem install rake
Sudo gem install -v=1.0.1 rack
Sudo gem install rails --no-ri --no-rdoc -v=3.2.7
Sudo gem install rails
修改创建集群 create-cluster脚本
- if [ “$1” == “start” ]
- then
- while [ $((PORT < ENDPORT)) != “0” ]; do
- PORT=$((PORT+1))
- echo “Starting $PORT“
- ../../src/redis-server /home/wenqy/redis-3.2.6/redis.conf –bind 192.168.56.101 –port $PORT –cluster-enabled yes –cluster-config-file nodes-${PORT}.conf —protected-mode no –cluster-node-timeout $TIMEOUT –appendonly yes –appendfilename appendonly-${PORT}.aof –dbfilename dump-${PORT}.rdb –logfile ${PORT}.log –daemonize yes
- done
- exit 0
- fi
- if [ “$1” == “create” ]
- then
- HOSTS=””
- while [ $((PORT < ENDPORT)) != “0” ]; do
- PORT=$((PORT+1))
- HOSTS=”$HOSTS 192.168.56.101:$PORT“
- done
- ../../src/redis-trib.rb create –replicas $REPLICAS $HOSTS
- exit 0
- fi
在连接Redis集群时,会出现Could not get a resource from the pool或
ConnectException: Connection refused: connect等无法建立连接的错误。
就在加载Redis.conf 配置文件中,覆盖参数。启用集群模式,关闭保护模式,设置超时时间,注释掉IP绑定等等
创建集群
~/redis-3.2.6/utils/create-cluster$ ./create-cluster create
启动集群
~/redis-3.2.6/utils/create-cluster$ ./create-cluster start
关闭集群
~/redis-3.2.6/utils/create-cluster$ ./create-cluster stop
客户端访问,并查看集群信息和节点
~/redis-3.2.6/src$ ./redis-cli -c -h 192.168.56.101 -p 30001
cluster info
发现有6个节点,集群状态运行正常。

Cluster nodes
发现Redis集群,3主3从

对于开发使用而言,模式都是一样的。但关系型和非关系数据库有适应不同的结构化和非结构化数据。


发表评论